Showing posts with label Sewing. Show all posts

Tuesday, September 14, 2010

The Uniform Skirt...

...is done!

I used THIS tutorial and modified it a bit to create Addy's uniform skirt.  I decided to add shorts underneath so I used this tutorial for the shorts and then combined the two right before I added the elastic waistband.

Let me just say, pleating is hard for me.  I had to take this thing apart and rework the pleats quite a few times until I got it right and even then, after I sewed the side seams, I had to rip them out and rework the pleats...alot of ripping and resewing...but I'm learning!

I'm quite pleased with the end result and am glad I used the elastic waistband because it's very easy to get off and on for quick changes..especially since we are in the midst of potty training hell.

Addy loves her "princess" skirt and enjoyed twirling around the living room in it!  I had to bribe her with a jellybean to get a decent pic.  Whatever works, right?

Have a great day!

-Liz

Wednesday, September 1, 2010

My first pattern!

I finally bit the bullet and tried a pattern.  I only had to read the thing 1347384 times and look up most of the lingo but I DID IT! 

Addy needs to wear a uniform for school and finding uniforms for a 2T are hard and can get expensive so I decided to try and make one myself.  I chose this pattern for my first time.  It looks uniformy to me.


Simplicity It's So Easy 2511 at the local WallyMart for a nice $3.00.
I picked up some nice durable twill khaki fabric for $1.50 a yard!  I <3 my local Walmart. 

And here's the result.


That is ONE LONG SKIRT!  I had to take that part up a bit but if she has a ginormous growth spurt this year we are covered. 

I'm quite pleased that I was able to finish and learned a ton..like how to use the zipper foot and put in a zipper.  The lingo and directions threw me off and the pattern symbols look like chinese but I used online websites like http://www.threadsmagazine.com/ for helpful tutorials on how to do crap.  I'm so thankful for the internet.

 I plan on making some more skirts and maybe another jumper so Addy's school wardrobe this year will be set...all for under $20!

Now if I could just figure out how to sew a polo shirt...

Tuesday, August 10, 2010

Latest project...

This is my first attempt at making a baby toy.  The little boy who will be here soon has parents who are huge Star Wars fans and have decorated his room in stars, moons, and rockets...so I decided to try my hand at making a plush baby taggy toy in the shape of a rocket! 

I set off to Hobby Lobby land and found some great fabric that matched the colors of his room and then went off to find (or pray to find) and online tutorial of sorts...you know...since I have no blasted idea what I'm doing. 

Wouldn't you know it?  I found a GREAT tutorial!!  The Long Thread is a wonderful site full of cool and interesting projects so I used the easy to follow tute and came out with this:
 I have a super cool neighbor who loves sewing as much as I do and has WAY more experience, so I bribed her with some wine and she helped me construct this thing.  We used minky and fleece as well as felt and cotton and then attached taggie ribbons on the bottom.  I'm so excited about this little toy!  At the last minute I decided it needed more fun so I ripped one of Addy's old jingly toys, stole the jingly, and stuffed it inside.  I then decided to make a moon, sun, and star to match.  I didn't have a pattern for that...as you can see from that wonky star...I'm not sure what happened there.  :)

I was so excited when the mommy-to-be opened it and loved it!  And we had so much fun at my impromptu sewing party, that I'm pretty sure it's going to become a regular event.  The husband will have to get over it.  haha.

For my next trick I'm for real going to try sewing from a pattern.  Addy needs some uniforms for school and finding a uniform for a toddler that is cute as well as cheap isn't the easiest task... so I'm gonna make it myself.  Hmph.  :)

Friday, July 2, 2010

Summer means...

SHORTS! 

I decided to try and make A something besides a dress and settled on shorts.  Of course, the normal sewing novice would research patterns and follow some sort of direction...not me.   Nope.  I have to do things the hard way.  I took a pair of A's shorts that fit and traced around the pattern. 

My first attempt:
I love this fabric...but not sure what's going on with the crotch...


Um.  Yeah.  Not the fit I'm looking for and those teeny tiny ruffles?  TEDIOUS and may cause random acts of cussing.   But overall a meh sewing performance, and are great night night shorts.

Attempt Two:

Let's just take a moment to appreciate what an ADORABLE and hilarious kid I have.  .......
Okay the shorts.  Attempt two was much better, but the crotch was still weird and the back wasn't high enough to cover her diaper butt.  A toddler in low riders is not high fashion in my humble opinion.  And diapers don't come in low rider cut.  So we need to try again. 

Finally.  I came to my senses and googled a tutorial.  WHAT I was thinking by trying to do it on my own is anybody's guess.  So I found this tutorial at Crafterhours.blogspot.com and went to work. 

Attempt three:

Ahahahaha getting better!  You can see from the huge cheese grin on A's face that she likes her flower shorts.  She is obsessed with flowers so these were kind of special to her.  Please ignore the huge ski foot in the picture.  It's not mine.  I have sweet perfectly pedicured dainty feet I swear.  The back of these were still a little short because I didn't follow directions exactly and forgot to make the back crotch longer.  So onto attempt four.  Good thing I have a lot of time on my hands.


And I decided to make a full summer outfit!
 Walmart had this fabric on sale for really cheeeeap.  The top half was green with frogs, bugs, and rainbows, and the bottom half was the blue plaid.  I used this tutorial for the top and then made some shorts with drawstrings to keep them from falling down.  For some reason when I'm using elastic thread it isn't as elasticy as I thought it would be so the drawstring is helpful.

She wore this outfit to school today!  She loves the frogs and bugs.  I can't stop LOLing at her cheese grin.  So funny. 

So that's the end of my experience with shorts sewing.  Finally I feel confident to whip up a pair quickly if needed.  I know I could always go to Target or WalMart and buy shorts for the cost of making them, but what fun would that be? 

Monday, June 14, 2010

My first name is not Dooney

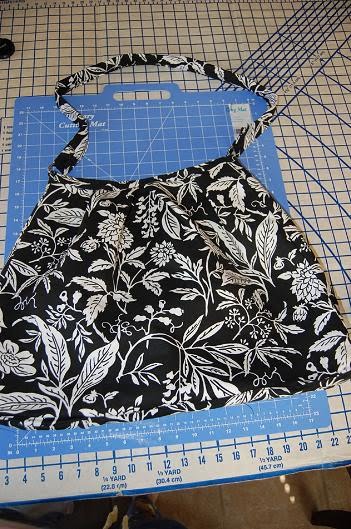
I made a purse.  My little sister graduated recently so I decided to try and use my new found skilz to make her something.  I decided on a hobo bag with a laptop sleeve and I was inspired by this tutorial from JCaroline creative.com.  There are really some amazing tutorials on this site so I decided that because I have no experience what so ever making a purse I might as well just jump into it. I picked up some very cute fabric at Wal Mart (and very cheap which is what I like) and started my project.

First, it's not like I cut the fabric, sat down, and tra la la a purse was made.  I poured over that tutorial forever before I could make a cut because I was so scared to screw it up.  Then I decided that I wanted a little bit different pattern so I made a square bottom vs. the rounded bottom thinking it might be a bit easier.  Cutting the pieces is definitely the easiest part.  LOL.  You can't really screw up a rectangle.  I also made this thing HUGE so it would carry a laptop.  I did okay with attaching the lining, but sewing the sides and bottom to the main pieces was a pain.  And I screwed that up.  Twice.  So the handy dandy seam ripper came in handy.  Finally I realized that my seam allowances were waaaay too small at the very bottom of the bag so I had to improvise and sewed a piece to the very bottom from the outside vs. sewing it and attaching it to the inside.

Anyhoo.  I finally finished the shell and started on the interior which was a bit easier because I had learned from my mistakes.  But I did sew the interior pocket (with my first zipper!) on crooked.  By that time I could really give a flying farkus so I went with it and decided that the mistakes would just give it character.  My sister just received it and said she loves it so I guess it's a win!  Yay!

And here it is: 

The bottom picture is actually the laptop sleeve that I just cut two rectangles out of each fabric and sewed together.  It's very basic with no bells and whistles but I did add extra lining in between the two fabrics to create padding.  I didn't use a tutorial for this so I just used my laptop sleeve and tried to recreate it.  Oh and again my seam allowances were too small so I had to sew from the outside in some places.

This was actually a great learning experience for me and my next project was a garden tote for my older sister's birthday so she could keep her tools in a cute bag.  It turned out better than above and I'll post about it later.  I'm thinking I"m gonna do the hobo again for myself.  Hehehehe.

Sunday, March 28, 2010

I SHIRRED!!

I am officially in love with sewing.  It is so relaxing!  I followed THIS awesome online tutorial from http://www.kukyideas.com/ and made Addy's birthday dress!  Shirring was definitely easier than I thought and her instructions were super easy to follow.  So here it is!

I really took my time with the seams to make sure they were straight and I drew lines where I shirred to make sure I kept those lines straight.  I'm really happy with how it came out. 

And here it is modeled by the lovely Addison:


Twirl girl!


I'm going to make a matching headband next.  Gotta find a new project though.  I'm addicted to sewing!

Friday, March 26, 2010

TADA!

The TShirt dress project:
I know, I know NOT BAD right?  LOL well, if I do say so myself... 
All kidding aside- sort of.  I was happy with how it came out at this stage...I could have just hemmed the sleeves and neckline and been done with it....then I started looking closely....then my need for perfection kicked in...and THEN I decided that I had to REDO the skirt and add sleeves and a collar.  ALL of which I had no business doing because well this is my THIRD project and sleeves?  Really?  That's a little advanced.  BUT I did it anyway and ruined the damn thing.  Greeeeaaat.  

I turned it into this.  Complete with holes everywhere where I pulled the seams out.  Sigh.  I suck.  Look at those sleeves....pure floppy awesomeness.  I don't know what's going on with the collar- and the skirt is now all angly and holy.  Rock on.


Oh well.  It's now a nice gown.  Addy loves it anyway because anything with Elmo and Cookie- no matter how hideous- is like fascinating rare art in her eyes.  I love how easy to please she is. 

I learned a lot though.  Like knit sucks to sew with and tears easily.  And how not to add a ruffle skirt...I sewed it on backwards at first.  Oops.  Oh and just leave well enough alone. 

I might revisit this project again...we'll see.  :)

Next up...shirring!!!  I've gone sew crazy!

Friday, March 19, 2010

Sewing tip of the day...

Buy a good seam ripper.  That is all.

LOL I'm trying to construct a T Shirt dress for Addy and silly me- instead of going by a PATTERN which normal people would do- I'm just winging it.  Needless to say, the darn thing is super tight and looks like a spandex rocker dress.  Um.  This may not be appropriate for my sweet girly TWO year old.  I didn't have a seam ripper so I used a steak knife.  I'm all about adapting.  This project may take longer than I expected.

Which makes me think of another tip.  If you aren't sure of what the hell you are doing, don't reinforce your seam with two lines of zig zag stitches before actually trying the dress on your kid.  It took awhile to rip those suckers out.